Flight Duration/Stop Button


During a flight, the instrument shows the duration of the flight, in hours:minutes. It doubles as a Stop button. Tapping the instrument at any time will end your flight session. When you have not landed yet, you will be asked for confirmation. You need to have a Stop Button somewhere on your dashboard.
Prior to Flyskyhy version 9.0, the instrument was also used as Start button. That function has now been taken over by the Start Panel.
The Map

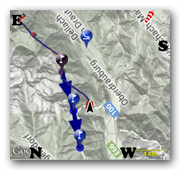
The map depicts the area where you are flying, showing your location and flight direction at the black arrow. It scrolls automatically, showing about 2/3 in front of you and 1/3 behind you. You can zoom in by double-tapping and zoom-out by single tapping.
During flight, the map shows colored spots where you have gone up or down. The spots range from green for weak lift through yellow to red where you have had strong lift. Blue spots show where you have gone down excessively. Based on the wind direction, the spots are moved to show where you will likely have that same lift/descent at your current altitude.
The trail of your flight is shown in the same colors.
A variety of other information is shown on the map, such as the wind direction, known landing and launch sites, the flying location of friends, waypoints and their route (with the waypoints extension), and restricted airspaces (with the airspaces extension).
Please explore the map settings as well, to choose the type of map to show (roadmap, satellite, or terrain), and whether it rotates with your (compass) heading, rotates with your flight direction, or stays oriented North up. You can also select the available zoom resolutions, and which information to show.
Photo button

Pressing the photo button allows you to take a picture during flight with the built-in camera. The photos will be stored on your Camera Roll in the Apple Photos app. Make sure you give Flyskyhy permission to use the camera and to store the photos in the Photos app. It will ask for permissions when you take your first photo, but if you missed that, you can also give permissions in the Settings app.
Nice to have a reminder of that great flight!
Nice to have a reminder of that great flight!
Vario status

If you connect with an external vario device, the Vario Status instrument shows the status of the connection with the device, and the battery level of the device, if available. The instrument can have 4 colours: grey, red, orange, and green. Grey indicates that you have not specified an external vario in the Settings, while green indicates a proper, working connection to the vario. Red and orange both mean you don't have a connection, but with orange the app is still in the process of establishing the connection. You simply may need to switch on the vario, for example.
Battery status

The battery status is shown in both percentage and in a graphical way. The icon is green when fully charged, orange when some charge has been used, and red when you should really attach an external battery. The icon also shows when an external power source has been attached.
Note that, just like for all other instruments, you can resize it to just get the icon, or just the digits.
Note that, just like for all other instruments, you can resize it to just get the icon, or just the digits.